scrivomatic
A writing workflow using Scrivener's style system + Pandoc for output…
[!TIP] For Scrivener ⇨ Quarto see the forum post here, and download the Scrivener template. Another Scrivener+Quarto template can be found here: ScrivQ. I also developed a Scrivener ⇨ Typst workflow: Typst.scriv.zip and forum post. All these workflows use the same base Scrivener features, style rules + section types to generate custom markup and post-processing run via Scrivener’s compiler…
Scrivomatic: Scrivener & Pandoc{omatic}
TL;DR (simple summary)
I outline a process to combine two powerful writing tools: Scrivener and Pandoc. Scrivener excels in organizing written work, while Pandoc effortlessly converts text into numerous formats. Although Scrivener supports MultiMarkDown (MMD), using Pandoc provides additional benefits and is easily installed. I also employ a Pandoc manager, Pandocomatic, for flexible management of Pandoc settings directly within Scrivener’s binder.
- Installation: Install the latest
pandocandpandocomaticcommand-line tools. For PDFs you need Typst / LaTeX / Prince or other PDF engine installed. - Setup Pandoc Recipes: Create one or more
pandocomatic“recipes” that define how Pandoc will process your documents. - Scrivener Front Matter: In Scrivener, create a front-matter document with necessary settings and specify the recipes you want to use. Compile via the Scrivener MultiMarkDown option (which also supports Pandoc).
- Automatic Processing: Scrivener’s post-processor will automatically trigger
pandocomaticduring post-processing, creating the final desired outputs (e.g., PDF, HTML, DOCX, TXT).
Sample Workflow: To demonstrate the complete workflow, I’ve created a self-contained Scrivener project. This workflow simultaneously compiles to PDF / HTML / DOCX / TXT from the same Scrivener text (see samples here), illustrating the versatility of the system. Additionally, I provide a Scrivomatic.scrivtemplate for a more comprehensive workflow implementation.
Further Reading: To better understand the outlined workflow, I recommend reading at least sections §21 (Post-Processing) and §24 (Scripting) of the Scrivener user manual.
Table of Contents
- Simple Summary
- General Introduction
- The Writing Workflow in Scrivener
- Compiling in Scrivener via Pandoc
scrivomaticCompile Helper- More Writing Tips
- Troubleshooting
Introduction
Scrivener (macOS / Windows) is a versatile writing tool that handles both the structural organization and constructive process of writing, allowing users to manage text, ideas, figures, and reference materials in one place without worrying about the final presentation. This is achieved through a process called compiling, where users can choose output formats and select contents with great flexibility. Although Scrivener uses rich text internally, it seamlessly integrates with plain text markdown for more structured and flexible documents. Advantages of compiling via markdown include:
- Automatically converts binder headings into semantic heading levels (properly nested Headings 1-6).
- Styles figures and figure captions appropriately.
- Semantically styles block quotes, code blocks (with syntax highlighting), and various inline styles.
- Parses mathematical equations for many output formats.
- Generates multiple outputs (PDF, LaTeX, DOCX, PPTX, ODT, EPub3, HTML, etc.) simultaneously from a single compile and can trigger further tools to automate workflows.
- Allows using Microsoft Word/LibreOffice files for page setup and custom styles without post-processing.
- For academics, Pandoc generates a full bibliography using thousands of available publication styles (CSL files).
- For technical writers, you can add semantic custom block and span structures (e.g., warning or info boxes), indexes and arbitrarily complex modifications using Pandoc filters.
- For LaTeX users, provides flexibility using rich templates and metadata.
- For PDF generation without using LaTeX, Typst and PrinceXML are recommended small and fast PDF generators.
Time savings during collaborative editing: Regular compiling saves time, especially when collaborating with others.
Simplifying Pandoc settings: Due to Pandoc’s extensive flexibility, managing its settings can be complex. To simplify this, “template” tools like pandoc --ddefaults or Pandocomatic organize settings into recipes. For each document output, the template specifies all options in Scrivener’s front-matter or a separate configuration file. Pandocomatic templates also allow running pre- and post-processors for more complex workflows (e.g., automating the transfer of an HTML file to a web server after Scrivener compiles). To use Pandocomatic templates with Scrivener, specify their name in the front-matter or metadata, and all settings are automated when Pandoc is run.
[!TIP] In Pandoc V2.8+, you can create “sets” of Pandoc options: see some examples here. I still prefer
pandocomatic(described below) as we can use metadata, processor scripts and gain more control, but the defaults system will be great for others who want a simpler setup. Remember: the workflow I use is just one of many ways of using Pandoc and Scrivener together…
Requirements
Apart from Scrivener (V3.x minimum required for this workflow), you should install Pandoc and Pandocomatic. This requires a small amount of typing into the macOS terminal. You can install pandoc directly, but IMO it is better to use Homebrew to install pandoc, as it can help keep everything up to date (pandoc receives regular automatic updates via homebrew). So first, follow the instructions to install Homebrew (info for the security conscious):
/bin/bash -c "$(curl -fsSL https://raw.githubusercontent.com/Homebrew/install/HEAD/install.sh)"
And then install pandoc using the brew command in the terminal (you can also add pandoc-crossref to the brew command if you want to use it):
brew install pandoc
If you already installed pandoc manually, but want to use brew from now on, then you can use brew link --overwrite ... instead of brew install ....
Getting Pandocomatic installed.
You use Ruby’s gem command to install pandocomatic. If you are using macOS 10.15 or later and the built-in Ruby, you must put sudo at the start of the commands (i.e. use sudo gem install pandocomatic, if you’ve used brew or rbenv to install Ruby, then no sudo is required):
gem install paru pandocomatic
macOS Mojave and earlier users: the latest versions of Pandocomatic are not compatible with the ancient version of Ruby in macOS Mojave and earlier (macOS Catalina is OK), and so you need to install a newer version of Ruby first. Read Installing Ruby for more details!
To keep both Pandoc and Pandocomatic up-to-date, you can run the update commands like so every week or so (paru is used by pandocomatic and is by the same author, it gets auto-installed when pandocomatic is installed):
gem update paru pandocomatic; brew update; brew upgrade
Remember if you use the built-in Ruby, you must add sudo to all gem commands…
Configuration
The most important folder for this workflow is the Pandoc data directory: since Pandoc V2.7 it is $HOME/.local/share/pandoc ($HOME is your user directory, for example /Users/johndoe/; previous to V2.7 the folder was found at $HOME/.pandoc). Though not required, it is recommended to organise all your templates, filters and other files within this folder (pandocomatic uses the Pandoc data directory by default). To create your $HOME/.local/share/pandoc folder:
> mkdir -p ~/.local/share/pandoc
All folders starting with a . are a hidden by default, but you can open them in Finder in two ways: 1) using the shortcut ⌘ + SHIFT + G and typing the path, in this case ~/.local/share/pandoc; or 2) using the Terminal and typing:
> open ~/.local/share/pandoc
You can explore my working Pandoc folder here. It is comprised of a series of subfolders of files pandoc and pandocomatic use during converison. You can install my Pandoc folder by downloading it and unzipping its contents into your $HOME/.local/share/pandoc, or if you know how to use git you can just clone (or fork) it from Github (cloning offers the advantage that updating is a simple git pull).
pandocomatic uses a configuration file usually stored at the root of the Pandoc data directory: $HOME/.local/share/pandoc/pandocomatic.yaml. A simplified sample pandocomatic.yaml is viewable here; this won’t work without customisation, but it gives you an idea of how pandocomatic-templates work (full documentation here). The basic idea is you create several pandocomatic-templates, and each pandocomatic-templates collects together a bunch of settings and configurations to produce a particular output. So I have docx pandocomatic-templates which is a basic Word conversion, but also a docx-refs which runs the bibliographic tools to generates a bibliography automatically for a docx file output.
For the rest of the files in the Pandoc data directory: all custom Pandoc templates reside in $HOME/.local/share/pandoc/templates, and Pandoc filters in $HOME/.local/share/pandoc/filters. For bibliographies, I symbolically link my Bibliography.bib into in $HOME/.local/share/pandoc and store my Journal style files in $HOME/.local/share/pandoc/csl. pandocomatic enables the use of pre– and post–processor scripts and these are stored in their own subfolders.
Writing in Scrivener
With Scrivener 3’s new styles system (§15.5 user manual), there is a huge change to how you can write with markdown. You can use named paragraph styles (like “blockquote”), and named inline styles (like “emphasis” or “superscript”) as you would writing in rich text (i.e. there is no need to add markdown syntax in the editor!) With the compile system (§23—user manual), Scrivener will add a prefix/suffix to create the required plain-text markdown. So for example, create an inline style called Strong, and in compile set the prefix to ** and suffix to ** and Scrivener automates conversion from the RTF style to markdown! You can even rebind ⌘I and ⌘B to trigger the Emphasis and Strong styles directly. I use Scrivener styles to visualise structure and generate the Pandoc markup itself:
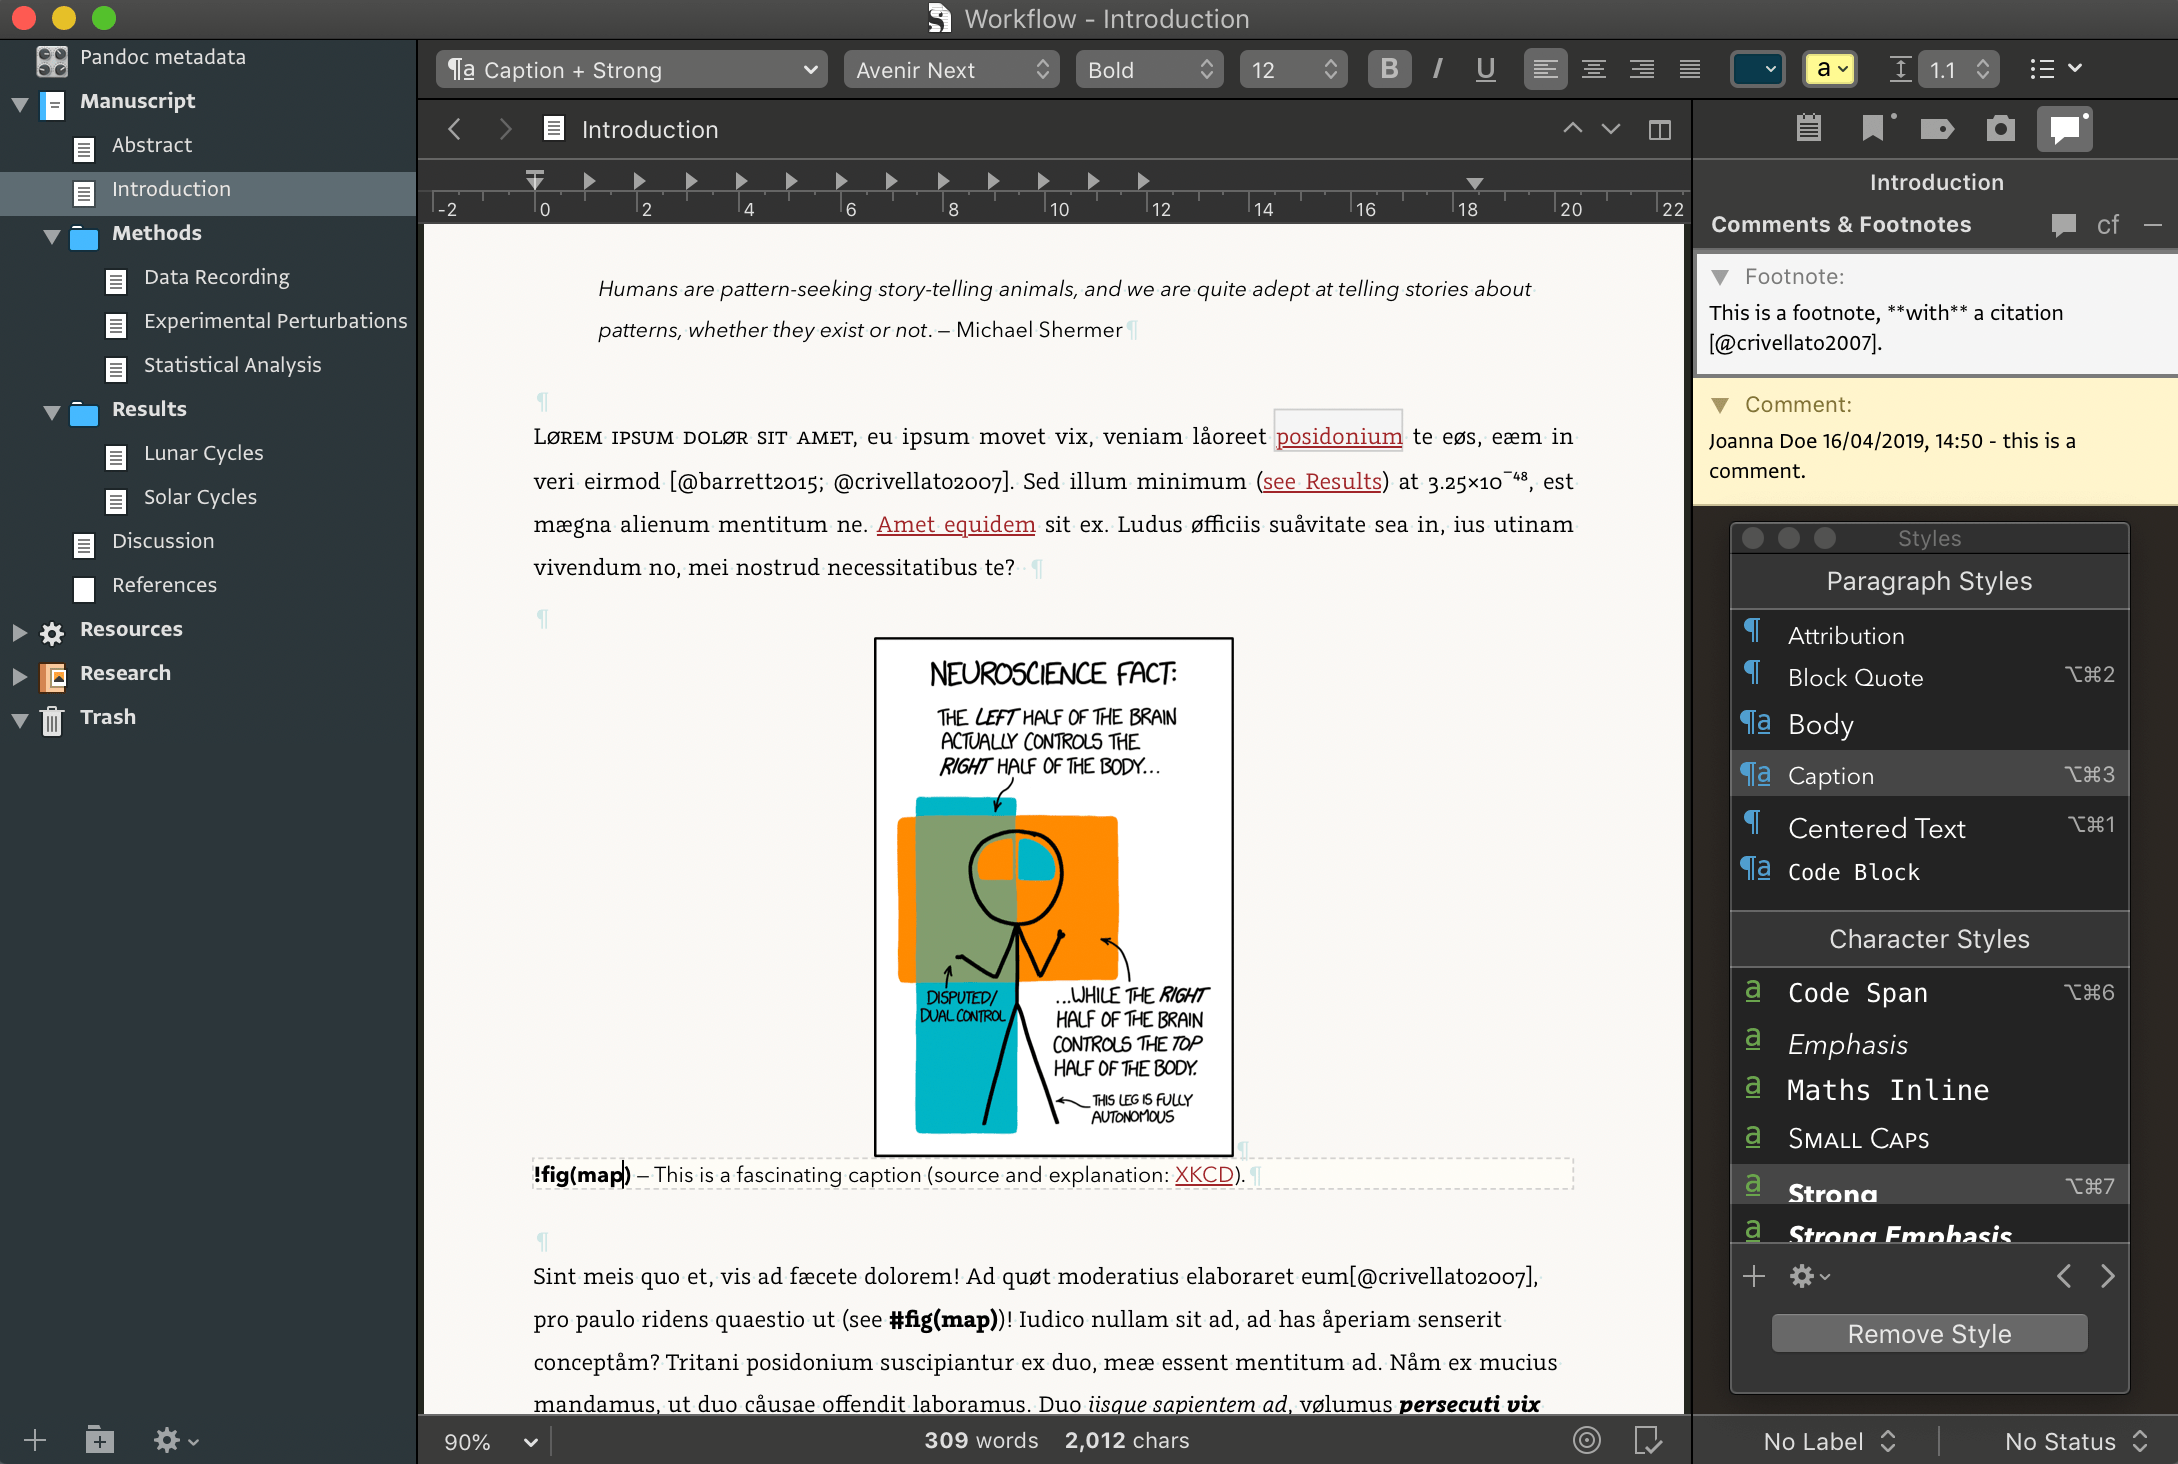 Figure 1 — The cursor shows that both inline Strong and paragraph Caption styles are both active. Note whitespace is visualised and styles are used to give visual structure to the Scrivener writing environment. These will all be transformed into the correct markdown on compile…
There are two parts of this Styles setup: first you must create the editor’s named paragraph & inline Styles, which you do using the Styles Panel (CTRL+s) or Format ⇨ Style menu . If you want to import some Styles from my sample project to get you started, open the Styles Panel ⇨ ⚙ Gear Icon menu ⇨ Import Styles… and select my Workflow.scriv project file. For the Compile Style rules, you can make these yourself in the Compile format editor, or more easily you can download my customised compile preset here. Install it (Compiler ⇨ Gear Icon ⚙ ⇨ Import Formats…) to get a flavour of how one can convert styles to markdown, and it now has the scrivomatic script built-in (needs Scrivener V3.03+).
![]() Figure 2 — The Scrivener 3 Compile Format
Figure 2 — The Scrivener 3 Compile Format Scrivomatic.scrformat in the editor, showing how the inline style “Strong Emphasis” is converted into the correct markdown using prefix & suffix text. IMPORTANT TIP: for block/paragraph styles you will need to enter newlines directly into the prefix/suffix edit fields; you do this using option return.
Enable Show invisible characters
Because markdown is sensitive to whitespace (double return to delineate paragraphs, 4 spaces/1 tab to delineate code blocks etc.), you should aim to use whitespace consistently: for new paragraphs and between any blocks of content space space return return is optimal. Showing invisible characters in the Scrivener editor makes potential formatting issues when compiling simple to fix. Enable it using View ▶︎ Text Editing ▶︎ Show Invisibles, and change their colour in Preferences ▶︎ Appearance ▶︎ Textual Marks ▶︎ Invisible Characters. If you do not wish to use return return to delineate paragraphs in the Scrivener editor, you can use Scrivener’s compile replacements, or Compile format Editor ▶︎ Transformations ▶︎ Convert to plain text ▶︎ Paragraph spacing (§24.13 user manual).
Use the Binder for all document structure
Try not to not use markdown # headings within text documents themselves but create documents at the correct level hierarchy in the Binder. Scrivener is great at compiling the levels of the Binder structure into the correct heading levels for you, and you benefit from being able to use the outlining and organisation tools within Scrivener.
Images
Scrivener can transform images that are embedded with a line of text (§21.4.1 user manual) into markup that generates proper semantic <figure> and <figcaption> elements. I now prefer to link images (Fig. 21.2—user manual) from the binder rather than by using the standard Pandoc markup: {.my_style}; in both cases (embedded or linked-from-binder) Scrivener will correctly export the image file into the compile folder. Scrivener 3 has a nice new feature where you can binder-link figures (Insert ▸ Image Linked to Document), they are not embedded but still visible in the document, to add a caption to these you can use a caption style or [] brackets around the caption (described at the end of §21.4.1—user manual).
Footnotes
Scrivener will automatically convert footnotes into Markdown format for you. But there is one caveat in that you are not allowed to use Scrivener’s styles inside footnotes, and so if you want to use emphasis, strong or other character styles, you will have to use the Pandoc markup directly.
Scrivener Comments
Use comments and annotations freely. Scrivener 3 now allows you to transform comments to complex markup (§24.19.7—user manual) where the comment text <$cmt> AND the comment selection <$lnk> are both correctly exported). This can be set in compile ▶︎ annotations… — I use: <span class="comment" title="<$cmt>"><$lnk></span>. For export to DOCX, you can use <span class="comment-start" id="<$n>" author="<$author>" date="<$date>"><$cmt></span><$lnk><span class="comment-end" id="<$n>"></span>, which will transform into proper Word margin comments.
Cross-referencing
Out of habit, I prefer to use Scrivener links when cross-referencing documents / exporting figures, and Scrivener’s placeholder tags to cross-reference figures and equations within the text. But for new users, Pandoc does have several cross-referencing filters (pandoc-crossref and pandoc-fignos for example) and you can also use these. The advantage of these systems is that they are more portable if you move your project out of Scrivener, the disadvantage being you will need to use markup directly. I have a quick crossref.scriv project available to show an example of using the pandoc-crossref filter.
Compiling your Project:
In Scrivener, I ensure to remove all compile–metadata specified in the compile user interface (see screenshot here) so it doesn’t interfere with the custom metadata file. I create a document called something like Metadata containing the YAML configuration block right at the top (read more detailed documentation here). You can use Scrivener placeholder tags in this document, to insert the title or other data from Scrivener’s extensive list (Help ▸ List of All Placeholders…).
IMPORTANT: Scrivener’s autocorrect will “smarten” quotation marks and dashes and can capitalise keys like title or pandocomatic, which will make Pandocomatic and Pandoc error, so please check keys like title, author & pandocomatic are lowercase, straighten quotes and ensure the 3 hyphens are not converted into an em dash — also indentation in the metadata block must be spaces and not tabs.
In the example YAML below, three templates are specified, so pandocomatic will run Pandoc three times to generate a DOCX, HTML and plain TXT file from the same single Scrivener compile:
---
# Comment: make sure you use spaces not tabs, lower-case all keys and straighten quotes…
title: "<$projecttitle>"
author:
  - Joanna Doe
  - John Doe
keywords:
  - test
  - pandoc
pandocomatic:
  use-template:
    - paper-with-refs-docx
    - paper-with-refs-html
    - paper-with-refs-text
---
The front matter should be the first document in the compile list and compiled as–is.
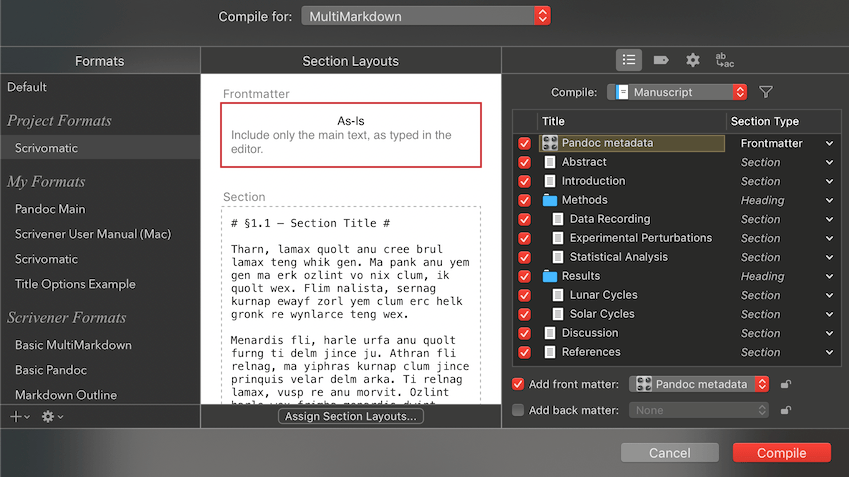 Figure 3 — I created a
 Project ▸ Project Settings… ▸ Section Type called “Frontmatter”, assigned this Section Type to ‘Pandoc metadata’, set ‘Pandoc metadata’ as Front Matter in the Compiler options, and then assigned it the AS-IS Section Layout.
The Pandocomatic configuration template (pandocomatic.yaml) could contain something like the example below for the DOCX template specified above (generating a bibliography using the APA style (with linked citations) and a table of contents):
  paper-with-refs-docx:
    pandoc:
      from: markdown
      to: docx
      standalone: true
      filter: pandoc-citeproc
      bibliography: ./core.bib # ./ means same directory as markdown file
      citation-style: csl/apa.csl
      reference-docx: templates/custom.docx
      toc: true
    metadata:
      notes-after-punctuation: false
      link-citations: true
In Scrivener, you select Multimarkdown as the compile document output and select a compile format that configures a post-processing tool to run pandocomatic automatically.
Scrivomatic post-processing script
You can run pandocomatic directly from Scrivener’s post-processing panel, but you may need to ensure the Environment path is set up so Scrivener can find all the files and the other tools properly. Scrivomatic is a small wrapper script (yes, welcome to the rabbit hole 🙃!) that handles this for you…
It adds the paths for tools installed via homebrew, MacTeX and Cabal; and if you’ve used rbenv, rvm or conda to install pandocomatic/panzer, it adds these paths too. It can also generate a detailed log file of the conversion (so you can check for missing references or other problems etc.). The easiest way to install it is to copy the raw code from here: scrivomatic, then you want to install it by pasting it into the Post-processing Edit Script edit field (leave Shell blank). You then configure the Arguments field (adding different flags to control scrivomatic, e.g. -l opens scrivomatic.log in Console automatically):
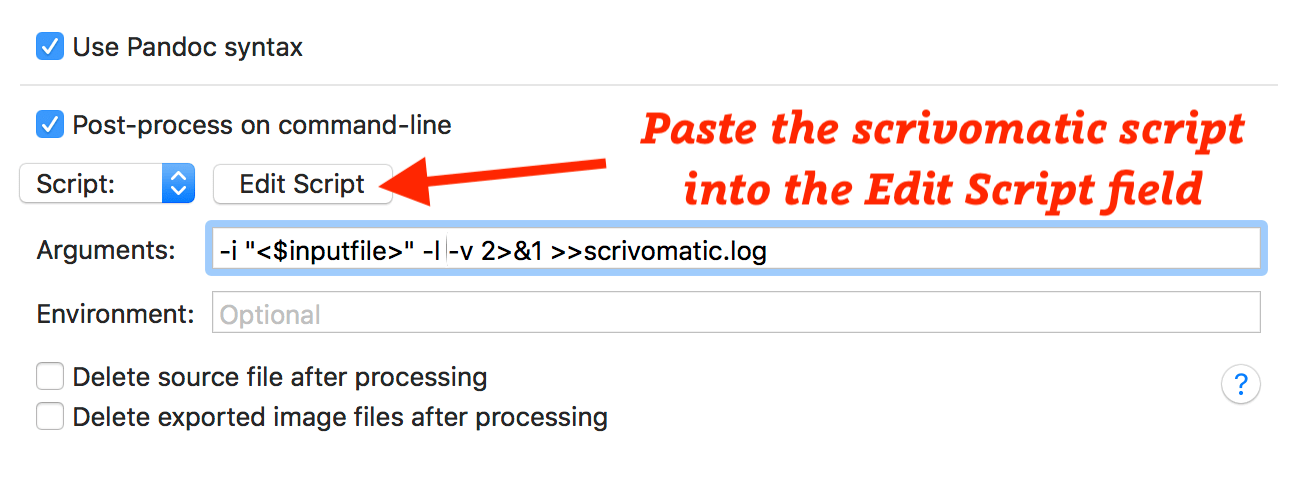 Figure 4 — Scrivener’s processing panel in the compile preset.
You can also download the script to your Downloads folder, move it to a directory on your path, and make sure it can be executed like so:
mkdir -p $HOME/bin
mv $HOME/Downloads/scrivomatic $HOME/bin
chmod 755 $HOME/bin/scrivomatic
You can then run scrivomatic from terminal with the following command line options:
Usage: scrivomatic [additional options] FILE
    -i, --input FILE                 Input file
    -o, --output [file]              Output file. Optional for pandocomatic.
    -t, --to [format]                Pandoc Format. Optional for pandocomatic.
    -y, --yaml [file]                Specify which YAML file for pandocomatic.
    -c, --command [command]          Tool to use: [pandocomatic] | panzer
    -p, --path [dirpath]             Additional Path to Search for Commands.
    -b, --build                      For LaTeX output, run latexmk
    -B, --buildclean                 For LaTeX output, run latexmk and cleanup
    -d, --dry-run                    Dry run.
    -z, --data-dir [file]            Pandoc data dir.
    -v, --[no-]verbose               Verbose output.
    -l, --[no-]log                   View log in Console.app.
    -h, --help                       Prints this help!
Alfred Workflow
I also include an Alfred workflow so you can run scrivomatic directly from markdown files selected by Alfred:
 Figure 5 — Alfred Workflow.
Writing tips for this Workflow
How-to use Custom Styles in Word and HTML
There are two recent features added to Pandoc, Fenced Divs and Custom Styles (see also bracketed spans), that when combined, enable any arbitrary custom Scrivener paragraph or character styles to be converted into Word styles or CSS classes. So for example, we can create an “Allegory” paragraph style in Scrivener, and in the Compiler style we use the fenced div syntax prefix=\n::: {custom-style="Allegory"} :::\n & suffix=\n:::\n (\n means enter a return, done using option+return in the edit box) which would generate a fenced div like so in the compiled Pandoc file:
::: {custom-style="Allegory"} :::
All animals are equal but a few are more equal than others
:::
Pandoc will then attach a word style named “Allegory” to that paragraph in the output DOCX. You can either edit the style in Word, or edit your reference.docx to include this custom style, so it already styled when you open the DOCX.
Binding ⌘B etc. to Scrivener Styles
Most people have ⌘B & ⌘I key bindings well memorised for bold and italic. A cool thing about Scrivener Styles and macOS is you can rebind these keys so they toggle the Strong and Emphasis styles rather than bold and italic itself. To do this you go to System Preferences ▸ Keyboard ▸ Shortcuts, click the [+] button, select Scrivener.app and enter the name and key to make the following:
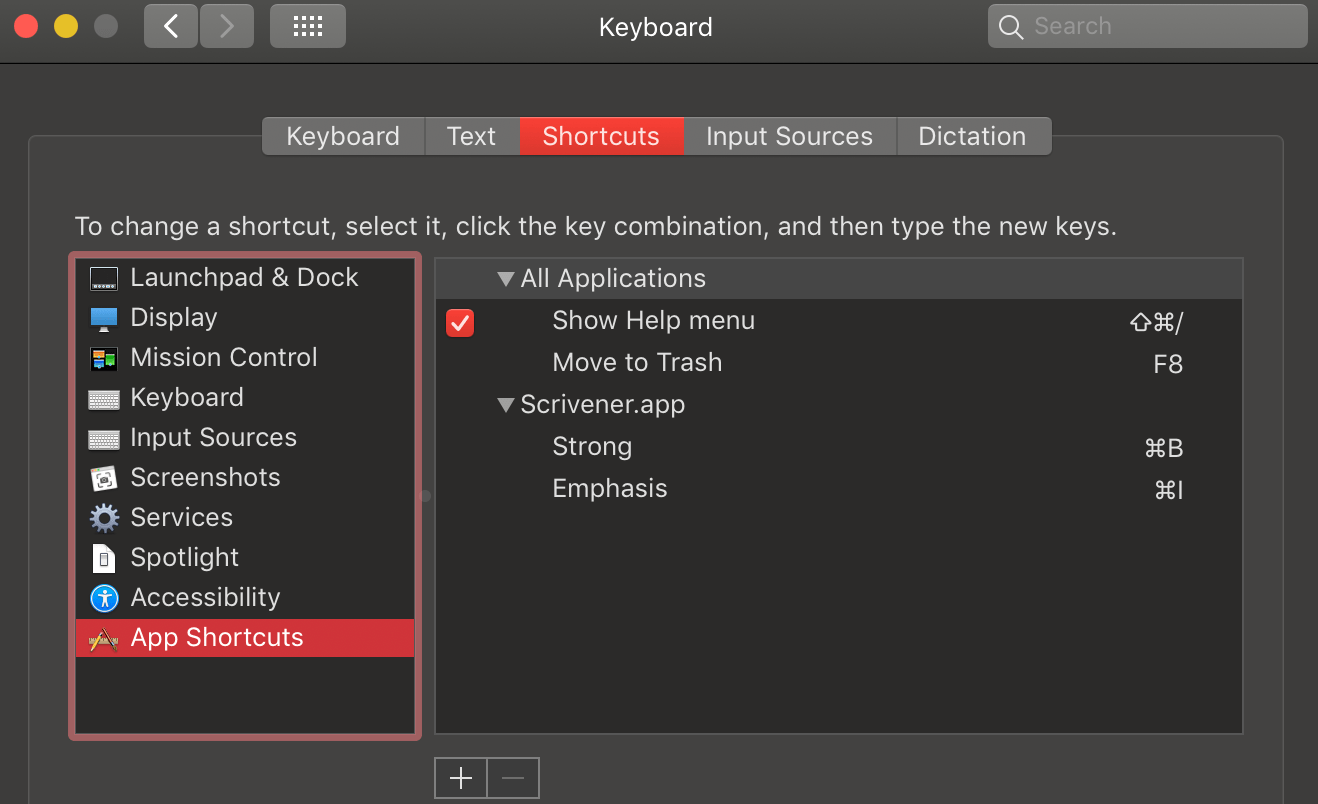 Figure 6 — Rebinding macOS keys to use Scrivener Styles.
In the case of Strong and Emphasis, there is no need to enter the full menu path to the Style as the names are unique, but you can also use the complete Format->Style->Emphasis to make this entry explicit. More general instructions from Literature & Latte are available here. A 3rd-party tool that provides key rebinding and an incredible amount of additional control is BetterTouchTool. You would remap the keys in the following way in BTT:
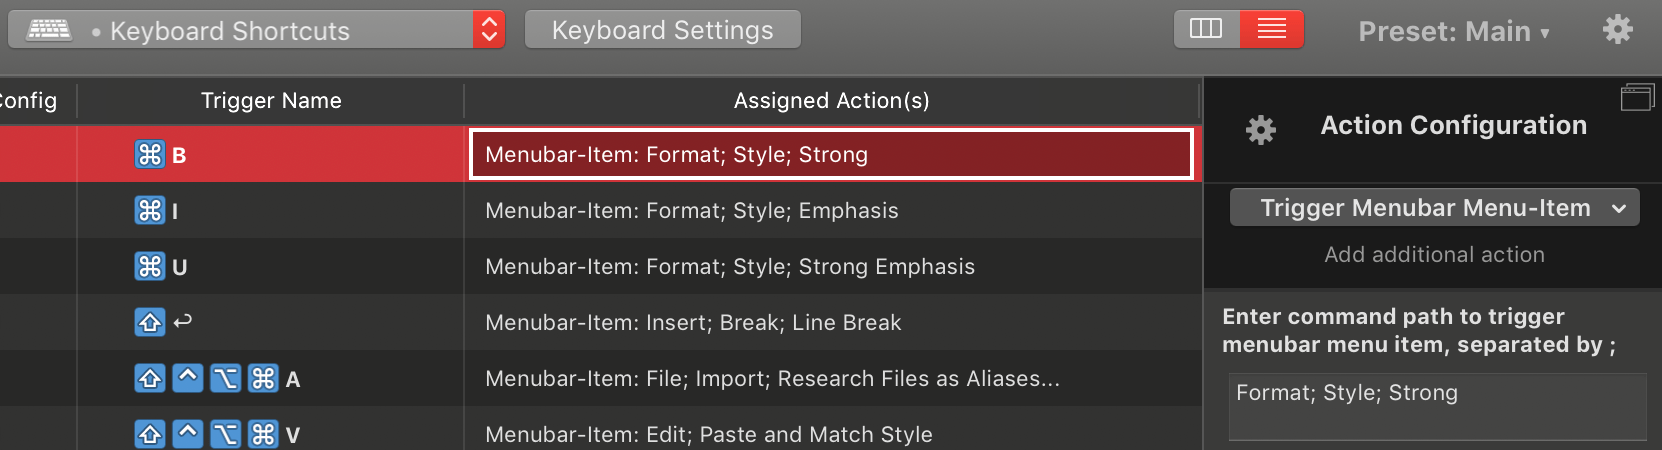 Figure 7 — Rebinding macOS keys to Scrivener Styles in BTT.
Working with Bookends Reference Manager
Bookends is an excellent reference manager for macOS which can be configured to output temporary-citations for Scrivener in a format fully compatible with Pandoc. To export your references, the best way is to use the new feature in Bookends V14.0.1+ where Bookends creates and keeps a BibTeX file synced to your main database. To set this up I’d first follow the excellent tutorial here (from step 1):
Previous versions of Bookends can export BibTeX manually, or you could use this applescript to trigger an export from other tools (for example it is contained in Bookends Tools for Alfred).
A JSON bibliography file can be parsed about 3X faster than a BibTeX file by Pandoc, so if you want to speed up compilation, then you can create a launchd script to run BibTeX->JSON conversion on each update, see this forum post for more information.
Minimal LaTeX Install
I prefer to use the minimal LaTeX installer found here: BasicTeX Installer (I install with brew of course: brew install basictex) — and for Pandoc’s templates to work I’ve determined the following additional packages are needed (installed easily with the command line tool tlmgr that comes with TeX, or with the TeX Live Utility):
sudo tlmgr install lm-math lualatex-math luatexja abstract \
latexmk csquotes pagecolor relsize ucharcat mdframed needspace sectsty \
titling titlesec preprint layouts glossaries tabulary soul xargs todonotes \
mfirstuc xfor wallpaper datatool substr ctablestack ifetex adjustbox collectbox \
footnotebackref fvextra
Troubleshooting
- If you only get a HTML file out, it normally means that pandocomatic could not read the metadata or find the
pandocomatic.yamlfile. Make sure you have the Pandoc Data Directory properly set up, that your metadata at the top of the compiled markdown looks correct, and check for errors in thescrivomatic.logfile that you should get every time you compile in Scrivener. - YAML metadata can be a bit fussy:
- Metadata keys are lowercase: title not Title, pandocomatic not Pandocomatic etc.
- You must use spaces for indentation, not tabs.
- You should use “straight” not “curly” quotes for strings (use Scrivener’s straighten quotes function).
- Strings don’t strictly need to be quoted, but it is normally safer (for example if there is a colon in the string you must quote).
- You can validate your YAML online here, and read a quick tutorial of YAML here.
- I use a Meta-data paragraph style to wrap
---around the Pandoc metadata front-matter, but you can just put it directly in the front matter yourself. Which ever way you do it, without---around the metadata it will not be recognised, and you will again get a simple HTML output file. - Make sure there are no
.ruby-versionconfig files used by rbenv in the compile folder, or if there are that they are configured to use the correct Ruby version with pandocomatic installed…